Localizing your Mod
|
The new plugin localization system is not fully ready for use. You may encounter issues with translation data not saving, and the system for importing and exporting translations to the community translation portal is not yet complete. This page is a work in progress. |
Satisfactory has been translated to multiple languages other than English. It’s possible to set up mods to be translated in a similar manner.
Before you can start writing translations, or crowdsourcing them from your users, you must make sure that the assets in your mod are set up to interact with Unreal Engine’s localization system.
Use The Right Kinds of Strings
In order to start localizing your mod, you need to make sure that text content is stored in the right format.
This means using FText and Format Text operations instead of FStrings and Appends. In blueprints, you can tell you’re working with FText when you see the triangle dropdown arrow
You can read more about this on the Unreal documentation.
This documentation page will not talk about how to use Unreal’s text formatting features, since the Unreal documentation already covers that well.
Mark Fields as Localizable, or Not
In order to make sure that Unreal gathers text as localizable, it must be assigned a localization key. In Blueprint assets, Unreal will do this for you automatically as long as it has been marked as such in the 'advanced settings' dropdown.
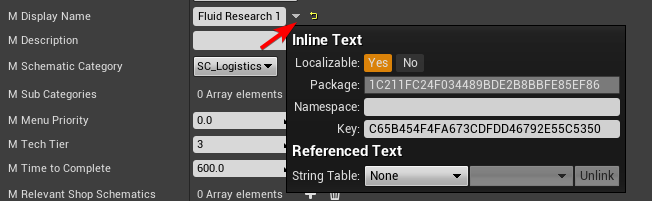
If a text field is not marked to be localized, it won’t be gathered and exported for translation later on in the process. A small warning icon is usually displayed next to these text fields when viewing assets in the editor.
A few Satisfactory asset types have fields that are notably not gathered for localization by default:
-
Schematic Display Names
-
Schematic Descriptions
-
Item Display Names
-
Item Descriptions
-
Item Abbreviated Display Names
-
Recipe Display Name (Overrides)
-
Buildable Display Names
-
Buildable Descriptions
As such, when adding your own values for these fields, you should be sure to mark the fields to be localized.
You may wish to intentionally exclude some fields from gathering. Examples include placeholders in widgets that get replaced by bindings, since they’d only be visible in the editor preview for the widgets.
|
Note that you can’t (easily) localize textures or images, such as those used in UI. As such, you should avoid embedding text inside of your UI graphics, as they can’t be localized. In widgets, consider using Canvas Panels, Overlays, and Render Transforms if you want to add stylized text to your widgets while still keeping it localized. |
C++ Localization
Detailed documentation for C++ localization can be found in the Unreal documentation.
When working in C++, you can use the NSLOCTEXT and LOCTEXT macros to mark text as localizable.
It’s important to note that you must define a localization namespace at the top of files using the LOCTEXT macro.
Before using the macro, define the namespace (for example, #define LOCTEXT_NAMESPACE "SML")
then use #undef LOCTEXT_NAMESPACE at the end of the file.
Open the Localization Dashboard
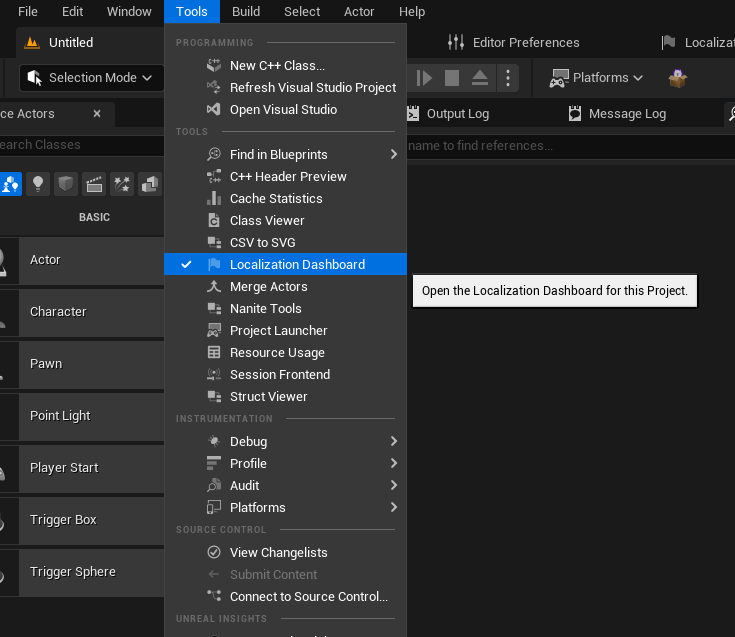
In order to open the Localization Dashboard,
navigate to Tools > (Tools subheading) Localization Dashboard.
Setting up a Localization Target
Adding a Localization Target
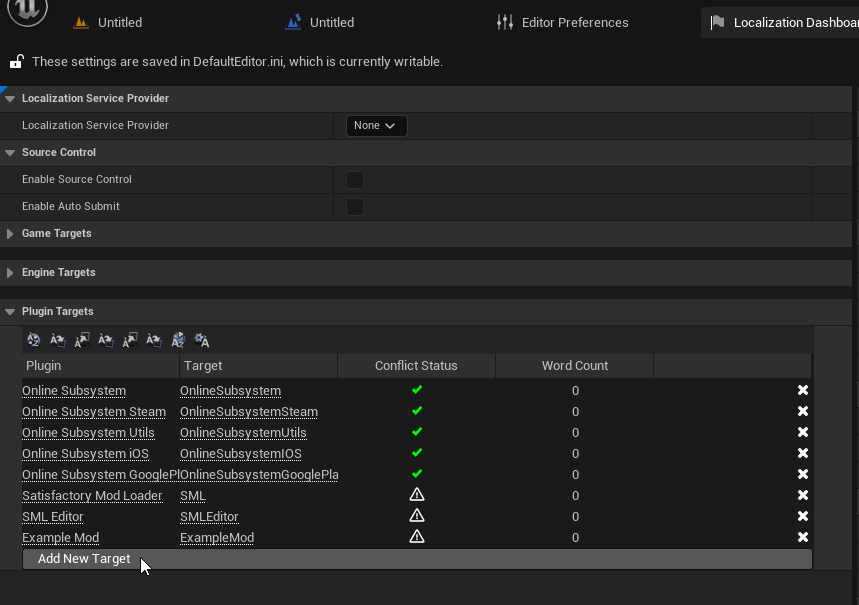
Next, add a new Plugin Localization Target by clicking the Add New Target button in the "Plugin Targets" panel on the left.
Plugin Localization Targets are a custom feature added to the engine by the Satisfactory Modding team.
|
Make sure not to click "Add New Target" under the Game Targets heading - this target type can’t be packaged with a mod. |
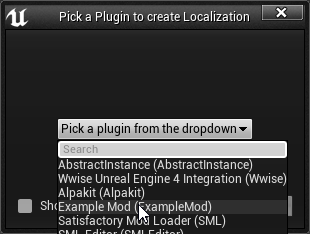
You will be prompted to select a plugin to localize.
Select your mod and press Done.
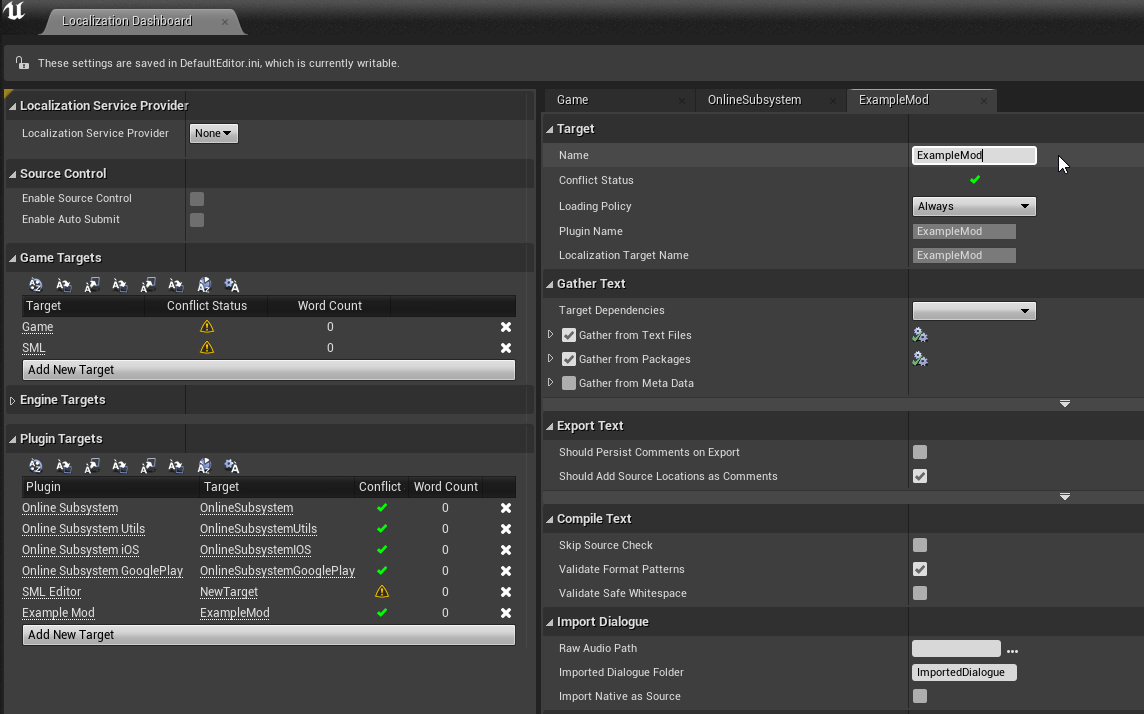
Configuring the Localization Target
To view your target, click on its name in the table row.
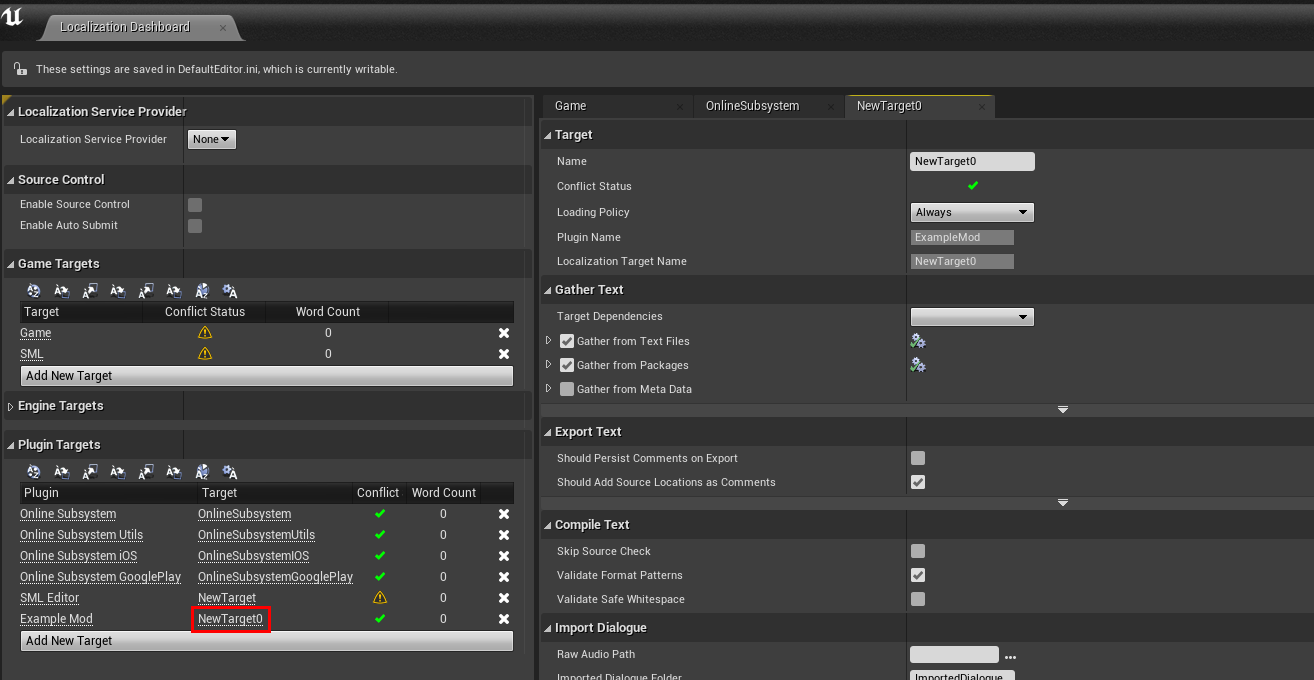
If the target’s name is not already your mod reference, rename it to match.
|
Localization Target names can be arbitrary, and you can have multiple localization targets in a single plugin. For organization purposes though, it’s better to have them matching your mod reference. Additionally, localization target names must be globally unique (unique across all mods installed) so it’s important to use a target name that will not be used by other mods - part of why the mod reference is a good choice. |
The default localization settings will be completely fine and should not be changed for the majority of mods. However, if you add another C++ module after you’ve made the localization target, rename the plugin, or want extra configurability or custom settings, you can change the generated localization profile yourself.
If your mod depends on localized content from other mods, select that mod’s target(s) in the "Target Dependencies" to avoid it being gathered by both mods.

Gathering Text
Next, Unreal’s localization system must gather all of the text that needs to be translated.
To start the process, scroll down in the panel for your target and press Gather Text.

Wait until the dialog box shows a green check mark next to the Gather Text task to close the dialog box. The "Word Count" for your mod should now be greater than 0.
You should repeat the text gathering process after adding new strings to your mod, for example, adding new item desctiptors or widgets with text fields. It’s a good idea to run this and review the results before each release of your mod to make sure that translation data is up to date.
Editing Translations
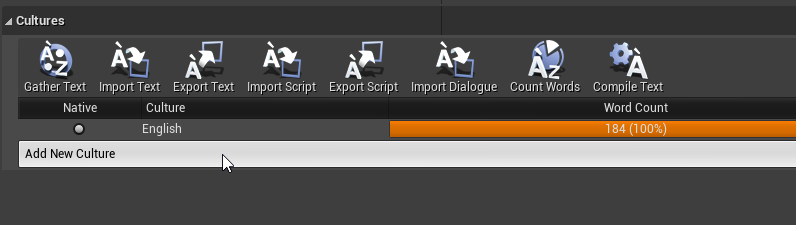
English, the default native culture, is the only currently listed culture.
You can view the text that was gathered by clicking the Edit Translations For Culture button.

The button will open an editor that allows viewing and editing the gathered text in real time. Changes you make in the native culture here will be reflected on the assets the text is gathered from. Changes made in other cultures will be stored in their culture data entry.
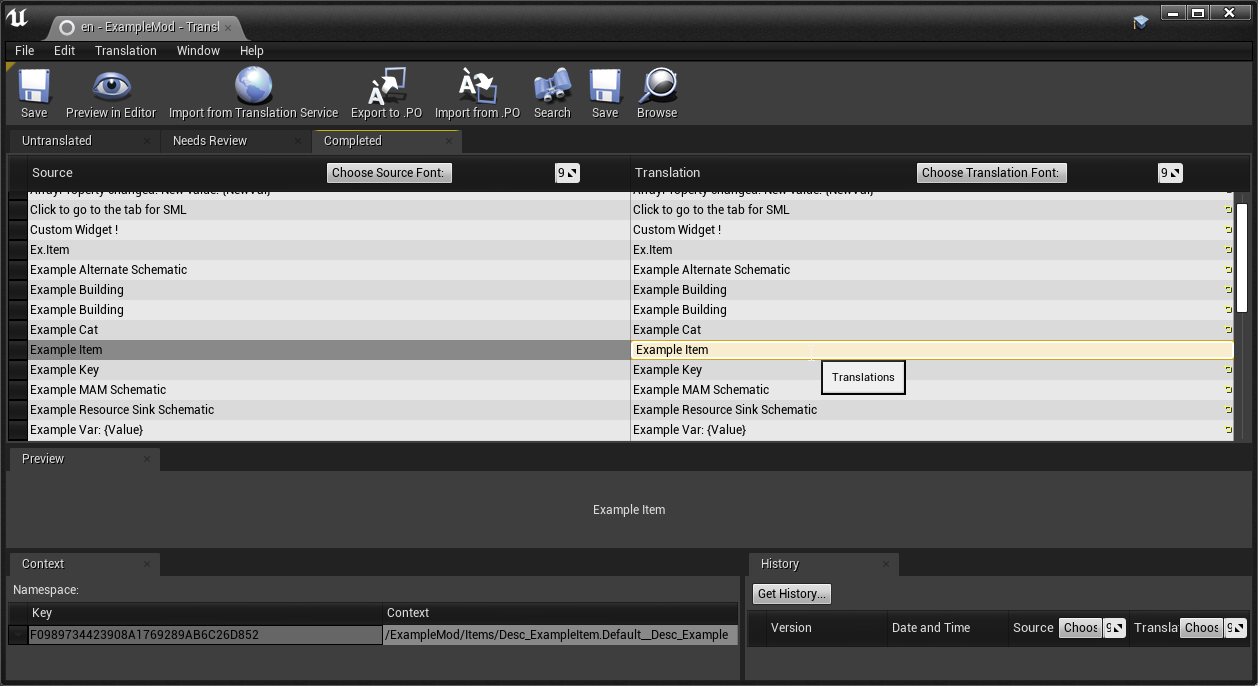
Navigating between the "Untranslated", "Needs Review", and "Completed" tabs will show the gathered text items in their various translation states. Note that for the native culture all text will inherently be "Completed" by default.
Reviewing the gathered native language data will help you track down text that should not have been gathered for localization. Check out the directions here to remove entries that should not be gathered.
Adding New Languages
In order to support additional languages, you must first create a culture entry to hold its data. Do this by selecting 'Add New Culture' in the Cultures table for your target.
After creating a new culture you’ll need to Gather Text again before you can open the editor for the new culture.
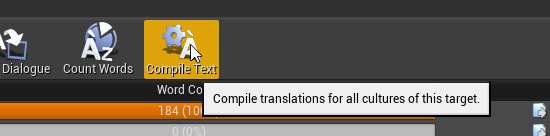
Compiling Translations
You can use Compile Translations to compile localization for all of your cultures, too
TODO what does this actually do, does it need to be done before releases?
Testing In-Game
A quick way to test your translations in-game is to set up the base game’s
Quick Switch Language feature.
This feature, added for use by translators of the base game,
allows using the QuickSwitchLanguage console command to toggle between your normal language and second one you select in the settings.
Enabling Users to Contribute Translations
TODO thought that the editor could integrate with Crowdin/external stuff for import/export, was it turned off?
It is unlikely that a single developer will be fluent in all of the languages the community wishes for a mod to support. As such, most mods set up a system to allow users to contribute translations to the mod.
The modding community hosts its own free to use instance of Tolgee at https://translate.ficsit.app/ that all Satisfactory mods and tools can use to crowdsource translations. We have also modified it to offer some extra features particularly helpful for modders.
Satisfactory uses the Crowdin platform to gather translations.
If you’d like to get involved, you can find information on how in the #welcome channel of the
official Satisfactory discord.
However, Crowdin is expensive to for most cases and has heavy restrictions on how many strings can be translated.
The Tolgee platform is free and open source, and can be self-hosted.
If you’d like to get started helping to translate a mod,
or get a project started for your own mod on the site,
join the modding discord, pick up the translator role in the #rules channel,
then follow the directions in the pinned thread in #mod-translations.
Tolgee Plugin Configuration
TODO when they finish their docs could link to this https://github.com/tolgee/documentation/pull/420/files
-
Add the plugin’s repo to your mods folder following the directions on the Importing Other Mods to your Project page. The Tolgee plugin source can be found here.
-
Enable the plugin in the editor from the
Edit>Pluginsmenu, which will require restarting the editor -
Create an API key for your editor to use on your account page. The API key should be created for your mod’s project on Tolgee. You may wish to set the Expiration to
Never expires. Enable all Scopes that you can, except disable theadminscope. Once the key is created, click to copy it. Note that this API key is for a single mod. Don’t share it publicly because actions taken using the key are considered performed by you. -
Back in the Unreal Editor, open the
Edit>Project Settingsmenu and search "tolgee". Enter the following data:-
Api Key: (The API key you just copied)
-
Api Url:
https://translate.ficsit.app(Note that there is no slash at the end!) -
Project Id: (Upon entering the last 2 fields, this should populate with your project’s ID, an integer. If it’s
INVALID, make sure you filled in the last 2 fields correctly.) -
Live Translation Updates: True
-
Update Interval: 60
-
Upload Strings to Tolgee
TODO only works with Game targets but still throws error code 500 when used https://discord.com/channels/555424930502541343/1126271289640894605/1127757678626754650
Once you have your targets set up you can use this
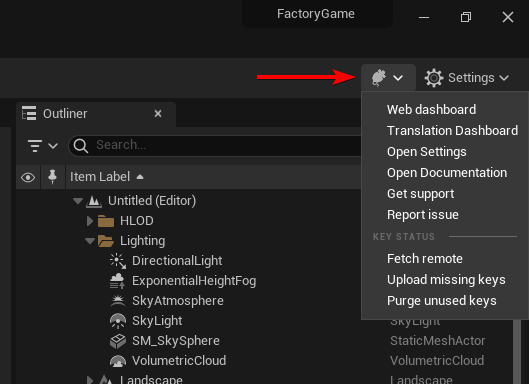
"Upload missing keys"
Exporting Strings to Tolgee
TODO click the export PO button?
This section will probably be deleted in favor of the Upload String to Tolgee section
Importing Translations from Tolgee to Unreal
TODO import PO button? (but Tolgee doesn’t offer export yet)
TODO arch note: If you want to manually change localization data or use 3rd party tools, it’s stored in %PluginName%/Content/Localization/%LocalizationTargetName%. After you change csv or po files, make sure to sync them with the engine before packaging using the localization dashboard.
Compiling Localization Files
TODO engine changes being made to keep them in plugin dirs so shouldn’t have to move via script
Compile in Unreal
Cross-plugin Localization
localization target is bound to one particular plugin. This does not mean source strings cannot overlap though. dependent translations and localization dependencies are also supported by the UE out of box, you can basically re-use strings from other localization targets (read other plugins) inside of your plugin without duplicating them. To do that you have to manually add your dependency localization targets into the configuration of your dependent localization target. It’s this setting in the localization dashboard (TargetDependencies.png)