Conveyor Rendering (Outdated)
|
Ben (CSS employee) has confirmed that, as of Update 5, this system is no longer in place. Conveyor items should now work with their mConveyorMesh field set in their descriptors. This page is kept around for historical reference purposes. If you are using a material for conveyor items that does not extend Factory Baked make sure to enable 'Used with Instanced Static Meshes' in the material’s Details. |
Introduced with Update 4 was a new complex, high performance rendering system for item conveyers. It was created to keep the game performing well given the mesh instancing behavior changes in Unreal Engine 4.25.3. Below are the details of how to set up modded content to use this new system, as well as details on how it works.
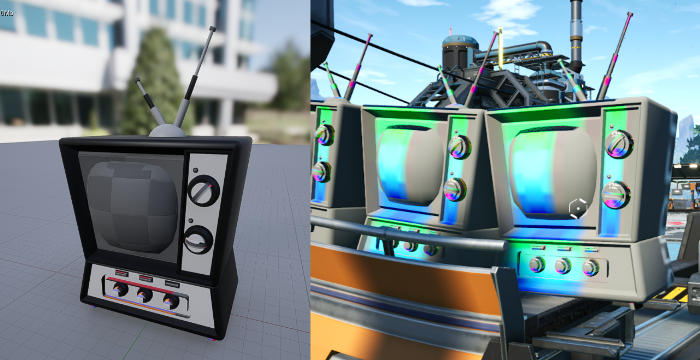
If not set up correctly, items on conveyors will render with the incorrect material as shown below.
For a finished example, check the /Utils/Materials/ folder in your starter Unreal project.
Mesh Requirements
As covered in the
Getting Started Guide,
the M Conveyor Mesh field of
FGItemDescriptors
must point to the mesh intended for use when both dropped ground and on conveyors.
The item will always use this mesh for both of those states - there is no way to distinguish between them.
To fit within belt edges and the opening ports of machines, the mesh should fit inside of a bounding box with the following dimensions:
X: +- 1m, Y: +- 0.74m, Z: 0m to +1.6m
It is recommended that meshes be smaller than this, especially in the X axis, to avoid clipping on corners and slopes. Consider looking at the ore and silica models for examples.
The fewer vertices an item mesh has the better. Items moving around on conveyors will often be rendered en masse, and having too detailed of a mesh will cause significant lag problems. Consider examining the meshes of base game items to get an idea for what you vertex 'budget' should be, and add intricate details via the material as opposed to the mesh.
Material Requirements
The mesh specified in the descriptor MUST point to a Root Material with the properties described below. If the material doesn’t have the config defined below, it will not look correct on conveyors, but will look fine when dropped on the ground.
You will require three textures for your material - Albedo, Normal, and Reflection.
Next, you will need to create the following materials, all of which are instances of Factory Baked with different settings. Reference that article for details on what should be in each texture.
Root Material
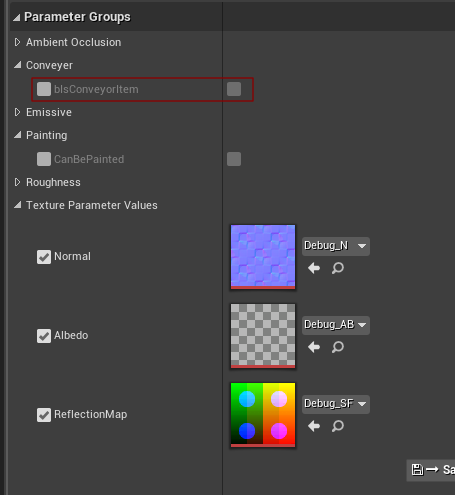
Create an instance of Factory_Baked.
Setup the material to use all the textures you’ve imported, and ensure that bIsConveyorItem = false.
There’s remains one more property to set, but it can’t be set up until the Conveyor LOD materials exist,
so we’ll come back to it later.
Conveyor LOD1 Material
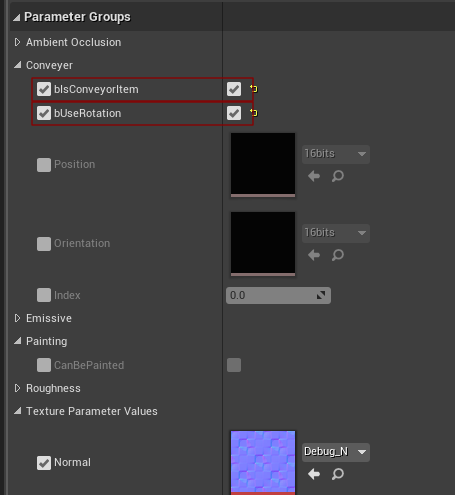
Duplicate the Root material made above, or create a new instance of Factory Baked and setup the textures.
The most important change to this material is the enabling of the two flags shown above,
bIsConveyorItem = true and bUseRotation = true.
Of note, bUseRotation may not be visible until bIsConveyorItem is turned on.
Do not worry if the preview mesh starts flickering, disappearing, or rotating weirdly. This is an artifact caused by the shader requiring a conveyor system, which will not exist until the mesh is used in game.
Conveyor LOD2 Material
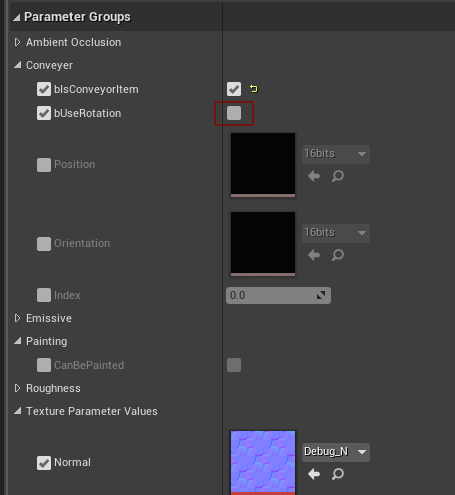
Create the third and final material.
The only difference from the LOD1 material is that it must have bIsConveyorItem = true
and bUseRotation = false to avoid errors.
You can reuse the same textures you used for LOD1, and will likely have the same editor-only visual issues.
Asset Data
In order for the conveyor system to find the materials,
we need to add custom data to the root material - the one the mesh is referencing.
This is the property we said we’d come back to earlier in this guide.
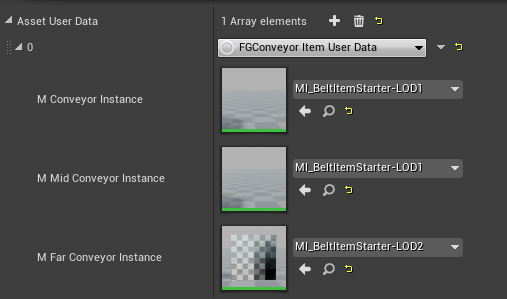
As shown in the picture above, go to the General section and add Asset User Data of type FG Conveyor Item User Data.
Since the mesh already knows about the root material, this will only point to the Conveyor LOD materials.
Current best practice requires the M Conveyor Instance and M Mid Conveyor Instance be set to LOD1,
and M Far Conveyor Instance set to LOD2.
How It Works (Advanced)
Coffee Stain Studios has provided an in-depth guide that informed the creation of this article (#PraiseBen).
To summarize the article, each conveyer belt writes information to a global texture file to track the orientation and location of the objects on it. This underlying texture is part of the reason behind the strict adherence to limits on belt length.
Each item instance on a conveyor is told roughly where along the belt it is. Next, the Factory_Baked shader, using the knowledge of where on the belt it is and the textures referencing position and orientation of the belt, generates an offset. This offset is then fed into the Unreal World Position Offset system to make the items appear to be on the belt at the right point.
When an object is placed on a belt the root material is examined for the custom asset data. If it’s found the system hooks up the targeted materials for the conveyor system to feed their information into.
If the data is not found then empty materials with debug textures are used. If the data is found but the materials are misconfigured, the items will end up rendering at coordinate 0,0,0.