Linux Modding Environment Setup
Although Satisfactory does not have official Linux support, and Unreal Engine typically prioritizes Windows for development, significant community efforts have resulted in a mostly stable Linux development environment for Satisfactory modding.
|
Are you a Windows user? These directions cover setting up the modding environment on a Linux machine. If you are on Windows, follow the standard modding setup guide. |
Word of Caution
As Linux systems often have unique setups, expect to have to face some undocumented complications and join the Discord to seek setup assistance.
These directions are not intended to fully replace the normal Getting Started guide - we highly encourage you to read each section’s corresponding Windows setup step as well to get a better understanding of how the modding environment works, and troubleshoot issues that may arise during Linux setup as well.
Sections will have blocks like this one pointing out the corresponding Windows setup direction step(s), or directing you to another point on the page. Sometimes reading the corresponding Windows step is required to get information/links to proceed, so don’t skip them.
Prerequisites
Before we can begin, we must install the following packages with our distro’s package manager.
On Debian-based systems such as Ubuntu, this would be apt install, or dnf install on Fedora.
-
git(For version control) -
msitools(Formsiextract, used byvsdownload.pyof msvc-wine) -
tarandzstd(For decompressing the engine archive) -
dos2unix(For the Wwise patches, used by the SML project) -
wine(Needed to build Alpakit Win64 targets and open the Wwise Authoring application)
For example, on Fedora this would be:
dnf install git msitools tar zstd dos2unix wineEngine Setup
Now we can begin setting up our custom version of Unreal Engine.
Download MSVC
First, we must install MSVC using msvc-wine.
Copy and paste this into your terminal, but be sure to first swap <msvc_install_dir> to the directory where you want to install MSVC, then run it.
This will automatically clone the msvc-wine repository and use it to download the correct version of MSVC for the editor to use.
git clone --branch ue-patches https://github.com/mircearoata/msvc-wine.git

cd msvc-wine

./vsdownload.py --accept-license --dest "<msvc_install_dir>" --msvc-version "17.8" --sdk-version "10.0.22621" --channel "release.ltsc.17.8"

./install.sh "<msvc_install_dir>"
Next, you’ll need to edit either /etc/environment or ~/.profile with a tool such as Neovim, to set the UE_WINE_MSVC environment variable.
For example: UE_WINE_MSVC="<msvc_install_dir>" (make sure to surround the directory in quotes)
Then you may need to log out and back in, or restart your PC for the change to take effect.
Corresponding Windows step: Visual Studio
Download the engine
First, follow the standard setup directions to get access to the custom engine.
Once you have access, you can install the engine in one of two ways: Either build it from source, or download an already built archive from our GitHub releases.
From Source
A source build can take at least 2-3 hours depending on your hardware and will consume a boatload of disk space.
The tag from the release mentioned here will tell you what to switch to after you clone the repository.
Download an archive
Download each of the UnrealEngine-CSS-Editor-Linux.tar.zst.* files.
|
You do NOT have to download the |
Once those are done downloading, create a folder called UnrealEngineCSS or similar, and move the archives into it.
Then run the command below to extract them:
cat UnrealEngine-CSS-Editor-Linux.tar.zst.* | zstd -d | tar -xf -Project Setup
The Starter Project is a custom Unreal Engine project we distribute that includes modding tools and game headers/stubs.
wwise-cli Assisted Wwise Installation
Download the latest build of wwise-cli from https://github.com/mircearoata/wwise-cli/releases/latest.
Run this command in your terminal to download the required version of Wwise:
./wwise-cli download --sdk-version "2023.1.14.8770" --filter Packages=SDK --filter DeploymentPlatforms=Windows_vc160 --filter DeploymentPlatforms=Windows_vc170 --filter DeploymentPlatforms=Linux --filter DeploymentPlatforms= --filter Packages=AuthoringWhen that’s done, run this command to integrate it into the starter project, replacing <project_dir> with the path to your project:
Note the intentional difference between the sdk and integration versions.
./wwise-cli integrate-ue --integration-version "2023.1.14.3555" --project "/FactoryGame.uproject" Corresponding Windows steps:
Wwise Project Generation
Next, we need to open the Wwise authoring application to generate the Wwise project.
Run this command to open the Wwise Authoring application.
wine ~/.cache/wwise-cli/wwise/2023.1.14.8770/Authoring/x64/Release/bin/Wwise.exeIn the bottom left, click New.
Set the project name to SatisfactoryModLoader_WwiseProject, and the location to the root of your project folder.

If you get a pop-up saying No valid license key found. Wwise will run in Trial mode.,
you can ignore it and click Close in the bottom right.
Sound Bank Generation
Find the "Project Explorer" tab in the Wwise editor (left sidebar)
and select the SoundBanks sub-tab.
Right-click on the top level folder and click Generate Soundbank(s) for all platforms.
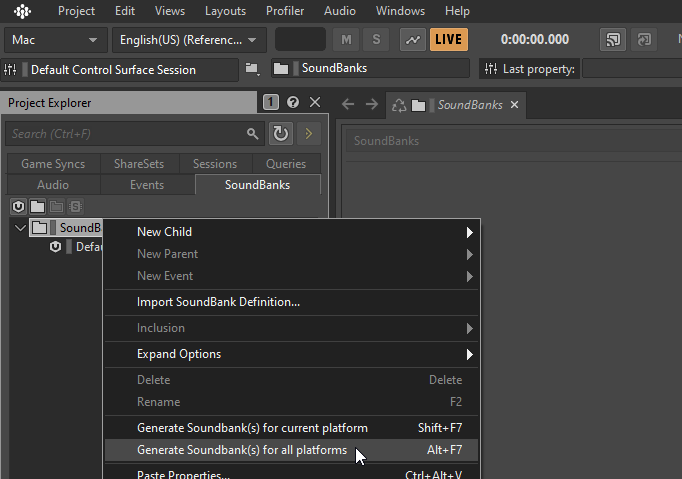
A pop-up should open stating "Completed with message(s)".
Click the Close button in the bottom right.
Corresponding Windows step: Generate Sound Banks
IDE setup
Now we must set up our IDE for building the starter project, and for developing with C++. Since Visual Studio isn’t available for Linux, you can instead use Rider or VS Code.
Corresponding Windows step: Generate Visual Studio Files
Rider
There are two methods to open the project in Rider. Uproject is preferred, but Solution + Makefile is also available if you need it for a specific reason.
Uproject
Due to a bug with Rider, you’ll need to install a plugin in order to see the Mods folder when opening the Uproject file.
Open the Settings window and find the "Plugins" page, then search the marketplace for
Unreal Project Model Mods Fix by Archengius and install it.
Restart the IDE if prompted.
You may encounter an error where the project model definition files fail to generate.

In order to fix it so you can edit C++ code, you need to open your file manager to
<ue_dir>/Engine/Source/Programs/ and delete the LiveLinkHub directory.
To avoid redundant compilation jobs every time you try to package a mod, you need to download these two files:
and
and place them in <ue_dir>/Engine/Build/BatchFiles/.
Ensure they can be executed by running:
chmod +x BuildUBT.sh DotnetDepends.shThen, in your preferred text editor, open:
<ue_dir>/Engine/Source/Programs/UnrealBuildTool/Configuration/UEBuildTarget.cs
and comment out lines 2474 through 2482 like this:
// GlobalSingleInstanceMutex? mutex = null;
// if (Rules.BuildEnvironment == TargetBuildEnvironment.Shared)
// {
//	 string MutexName = GlobalSingleInstanceMutex.GetUniqueMutexForPath("UnrealBuildTool_CreateCompileEnvironmentForProjectFiles", Unreal.EngineDirectory);
//	 mutex = new GlobalSingleInstanceMutex(MutexName, true);
// }
//
// CreateSharedPCHInstances(Rules, TargetToolChain, Binaries, GlobalCompileEnvironment, new NullActionGraphBuilder(Logger), Logger);
// mutex?.Dispose();
Now, run:
bash <ue_dir>/Engine/Build/BatchFiles/BuildUBT.shOnce that’s complete, you can move on to the compilation steps.
Makefile
The other method is to generate a Visual Studio Solution and Makefile to build the project.
Run the following commands, replacing <ue_dir> and <project_dir> with the respective paths.
To generate the VS Solution:
<ue_dir>/Engine/Build/BatchFiles/Linux/Build.sh -projectfiles -project="<project_dir>/FactoryGame.uproject" -game -2022To create a Makefile:
<ue_dir>/Engine/Build/BatchFiles/Linux/Build.sh -projectfiles -project="<project_dir>/FactoryGame.uproject" -game -MakefileOpen the FactoryGame.sln file in Rider.
In the Rider settings, under Toolset and Build, make sure .NET CLI executable path is set to <ue_dir>/Engine/Binaries/ThirdParty/DotNet/8.0.300/linux/dotnet
Then to build it, run make FactoryEditor or any of the other targets.
VS Code
To generate a code-workspace file, run the following command, replacing <ue_dir> and <project_dir> with the respective paths.
<ue_dir>/Engine/Build/BatchFiles/Linux/Build.sh -projectfiles -project="<project_dir>/FactoryGame.uproject" -game -VSCodeOpen the .code-workspace file, not the folder.
In the workspace settings, add <ue_dir>/Engine/Binaries/ThirdParty/DotNet/8.0.300/linux to omnisharp.dotNetCliPaths
IntelliSense
To support IntelliSense, first generate the Clang Data Base by running the following command, replacing <ue_dir> and <project_dir> with the respective paths.
<ue_dir>/Engine/Build/BatchFiles/RunUBT.sh FactoryEditor Linux Development "<project_dir>/FactoryGame.uproject" -Compiler=Clang -mode=GenerateClangDataBaseThe generated file will be created in the <ue_dir>, you’ll need to move it into the .vscode directory of the project_dir.
mv <ue_dir>/compile_commands.json "<project_dir>/.vscode/compile_commands.json"Next, create the .vscode/c_cpp_properties.json like so:
{
  "configurations": [
    {
      "name": "FactoryEditor Editor Linux Development (FactoryGame)",
      "cStandard": "c17",
      "cppStandard": "c++20",
      "intelliSenseMode": "clang-x64",
      "compileCommands": [
        "${workspaceFolder}/.vscode/compile_commands.json"
      ]
    }
  ],
  "version": 4
}
Exclude Files
Excluding unnecessary files can improve editor performance.
Example .vscode/settings.json file. You’ll need to replace <ue_dir> with the respective path.
{
  "files.watcherExclude": {
    "**/.git/objects/**": true,
    "**/Binaries/**": true,
    "**/DerivedDataCache/**": true,
    "**/Intermediate/**": true,
    "**/Saved/**": true,
    "<ue_dir>/Engine/Binaries/**": true,
    "<ue_dir>/Engine/Content/**": true,
    "<ue_dir>/Engine/DerivedDataCache/**": true,
    "<ue_dir>/Engine/Intermediate/**": true,
    "<ue_dir>/Engine/Saved/**": true,
    "<ue_dir>/Engine/Plugins/**/Binaries/**": true,
    "<ue_dir>/Engine/Plugins/**/Intermediate/**": true,
    "<ue_dir>/FeaturePacks/**": true,
    "<ue_dir>/Templates/**": true
  },
  "files.exclude": {
    "**/.git": true,
    "<ue_dir>/Engine/Binaries": true,
    "<ue_dir>/Engine/Content": true,
    "<ue_dir>/Engine/DerivedDataCache": true,
    "<ue_dir>/Engine/Intermediate": true,
    "<ue_dir>/Engine/Saved": true,
    "<ue_dir>/FeaturePacks": true,
    "<ue_dir>/Templates": true
  },
  "C_Cpp.files.exclude": {
    "**/Binaries/**": true,
    "**/DerivedDataCache/**": true,
    "**/Saved/**": true,
    "<ue_dir>/Engine/Binaries/**": true,
    "<ue_dir>/Engine/Content/**": true,
    "<ue_dir>/Engine/DerivedDataCache/**": true,
    "<ue_dir>/Engine/Intermediate/**": true,
    "<ue_dir>/Engine/Saved/**": true,
    "<ue_dir>/Engine/Shaders/**": true,
    "<ue_dir>/FeaturePacks/**": true,
    "<ue_dir>/Templates/**": true
  },
  "search.exclude": {
    "**/Binaries": true,
    "**/DerivedDataCache": true,
    "**/Intermediate": true,
    "**/Saved": true,
    "<ue_dir>/Engine/Content/**": true,
    "<ue_dir>/FeaturePacks/**": true,
    "<ue_dir>/Templates/**": true
  }
}Other
For other IDEs (not tested by us), you can check the engine UBT GenerateProjectFilesMode class implementation to discover command line options used for various other IDEs.
Compile the project
-
For Rider, select
Development,Editor,Linux, and then click the build button in the top right. -
For VS Code, press
Ctrl + Shift + P, then selectRun Task, thenFactoryEditor Linux Development Build
Then wait for the build to complete.
Corresponding Windows step: Project Compilation
Open the editor
If everything above was done correctly, you may now open the FactoryGame.uproject file in your Starter Project to launch the Unreal Editor.
Satisfactory Mod Manager
Satisfactory Mod Manager is used to install other published mods for testing purposes. Although not required to proceed, we advise installing now to be prepared for future work. We provide native Linux builds as documented in the SMM installation guide.