Required Software
To get started with modding Satisfactory, you’ll need multiple other pieces of software installed first. Don’t worry, we’ll guide you through each step of downloading and installing these dependencies.
This can be a very lengthy process, so if you take a break, make a note of where you left off so it’s easier to resume later.
Beware that the modding environment can take up a lot of space once everything is installed and built - 30+ GB is possible. Keep this in mind when deciding where put all your files - don’t keep them on a drive with very little space left.
Before you Begin
Make sure you’ve read the starting information on the Getting Started title page to learn important information about how to use these docs.
|
Are you a returning Satisfactory mod developer who already has a past modding environment set up? Make sure to follow the Updating your Mod guide before following these directions. |
|
Are you a Linux 🐧 user? These directions cover setting up the modding environment on a Windows machine. Check out the separate Linux Setup guide to develop from Linux. |
|
Community member SirDigby has created an open-source utility to assist with setting up the modding environment. It automatically completes many of the setup steps as long as your system setup is relatively standard. If you’d like the try it out, you can download it from SirDigby’s GitHub. If you run into any setup troubles using SMEH, make sure to tell anyone you’re contacting for support that you used it. |
Satisfactory
This one should be pretty straightforward, and odds are, you’ve already done it. Simply buy, download, and install Satisfactory from the Epic Games Store or Steam. Launch the game at least once to ensure all files get set up correctly.
Visual Studio
Unreal Engine’s build tools use MSVC (Microsoft Visual C++) and have good integration with the Visual Studio, a free of charge integrated development environment (IDE).
If you already have Visual Studio installed, you’ll need to run installer again and follow the steps below to modify your existing installation.
|
This version of Satisfactory works best with Visual Studio 2022, not the latest release version 2026. If you were to proceed with Visual Studio 2026 installed, you would have to select different Components than the ones we listed here, and certain editor functionalities like the Create C++ Class wizard will not work. To download 2022, either click here to directly download the Visual Studio 2022 Community installer from Microsoft, or visit the Release and Build History page heading "Evergreen Bootstrappers" to download the "Community" channel bootstrapper for Version 17.14 (which is the exact same link we provided above). |
After the installer has downloaded, run it and agree to any authorization prompts you receive along the way. Once you are prompted to install Visual Studio 2022 you have two options for selecting the relevant components.
Option 1: Import an Installer Configuration
Because the Visual Studio installer really wants you to install 2026 instead of 2022, this approach requires you to do a small workaround.
When the installer first opens, use its default settings to install Visual Studio 2022. If you were to close out of this prompt, only the option to install 2026 will be provided, and you’d have to close and reopen the installer to get it again.
After the installer completes, open it again and use the "More" dropdown on Visual Studio 2022’s entry
to select Import Configuration.
Download this configuration file
and select it in the installer’s prompt.
Next, press Review details and continue with the installation.
Option 2: Manually Select Components
From the Workloads tab, select:
-
"Desktop & Mobile" >
.NET Desktop Development -
"Desktop & Mobile" >
Desktop development with C++ -
"Gaming" >
Game development with C++.
You might have to scroll a bit to find them.
Next, from the Individual Components tab,
search for and select:
-
MSVC v143 - VS 2022 C++ x64/x86 build tools (v14.38-17.8) (Out of Support) -
.NET 8.0 Runtime (Long Term Support) -
.NET Framework 4.8.1 SDK
Note that even if some of these components are marked as "Out of Support", they are still the versions that Satisfactory and Unreal use, so you must use them.
While Visual Studio Installs
Downloading and installing Visual Studio can take a while. We advise you to find some lizard doggos to pet while you wait, or work on some of the other install steps below.
|
An alternative to Visual Studio which is very popular among C++ modders is
Rider for Unreal Engine.
If you consider using it, make sure you still have Visual Studio and the necessary VS-C++ packages installed,
as they are used by Unreal’s own compiler systems,
and make sure to use the |
Clang Toolchain for Linux Dedicated Server Support
Satisfactory’s dedicated servers typically run on Linux. Cross-compiling from Windows to Linux requires the compatible version of Unreal Engine specific CLang Toolchain to be installed prior to building for Linux Dedicated Servers. The download link for these files can be found on the Unreal documentation page for Cross-Compiling for Linux.
Currently, Satisfactory uses Unreal Engine 5.6.1 with custom changes provided by Coffee Stain Studios.
Therefore, the Cross-Compile Toolchain version required is v25 clang-18.1.0-based.
Download the correct Cross-Compile Toolchain from the link above and run it to install the relevant files. The default options that the installer offers are fine.
Custom Unreal Engine Version
Because Satisfactory uses a modified version of Unreal Engine, we modders need to be using that same version as well to develop our mods.
If you already have Unreal Engine installed for something else, that installation will not work for Satisfactory modding - you will still have to follow the below steps.
Link your GitHub as an Epic Games Developer Account
For this step, you’ll need a GitHub account, so sign up for one if you don’t already have one.
Once you’ve got a GitHub account, you’ll need to register it with Epic Games and join the Epic Games GitHub organization to be able to download this special version. Directions on how to link so can be found here.
If the page says, "Sorry, the service is temporarily unavailable. Please try back later." try turning off any ad-blockers or content filters you may have enabled and refreshing the page without cache (Ctrl+Shift+R).
You will probably have to check your email and confirm from there, as well as making sure you’re logged into your linked GitHub account when you follow the upcoming link.
Verify this step has worked by visiting this repository link: https://github.com/EpicGames/UnrealEngine/ If it worked, you will see a private GitHub repository. If it didn’t work, you’ll get a 404 page - try again in a few minutes and make sure you didn’t miss any steps in Unreal’s instructions.
Once you’re sure it works, close that browser tab - we don’t need any files from this repository. Visiting there was just to verify that you have access.
Link Your GitHub Account to Our Repository
In addition to the changes Coffee Stain has made to Unreal Engine, the modding community has also applied some engine changes of our own.
You’ll have to link your account through a tool we created in order to view our repository and download the required files. To use the tool, visit the following link: https://linker.ficsit.app/link
After the linking process is complete you should be redirected to the engine GitHub repository.
After you have access to the custom engine repository it’s safe to remove the application’s permissions by visiting your GitHub settings page.
|
If you’re curious, you can find the source code for the tool used to perform the linking process here. |
Download the Custom Engine
Next, navigate to the Satisfactory Modding custom Unreal Engine GitHub project to download some installer files.
The below box will contain a link to the specific release that you should download. It’s imperative that you download the correct engine for the version of the game you’re modding or you will have to repeat a large amount of the setup process again.
This is the latest stable version of the docs.
Stable (Release) and Experimental are currently both the same game version.
Download this engine version:
https://github.com/satisfactorymodding/UnrealEngine/releases/latest
Download the following files from the release linked above:
-
UnrealEngine-CSS-Editor-Win64-1.bin -
UnrealEngine-CSS-Editor-Win64-2.bin -
UnrealEngine-CSS-Editor-Win64-3.bin -
UnrealEngine-CSS-Editor-Win64.exe
Save all 4 files in the same folder, and make sure that their names are exactly the same as listed above otherwise the installer will not work.
|
If you see a "404 This is not the web page you are looking for" error, then you didn’t finish linking your account. The page is not dead, this is what GitHub displays as a security measure when someone tries to access a private repo and is not part of the correct organization. Check for emails from both Epic and GitHub, and be sure that you followed the above steps. You can verify that you’ve correctly joined the GitHub organization by checking for "EpicGames" on the GitHub Account Organizations page. If your GitHub account is already listed as linked on the Epic Games page you can unlink and relink it re-send the GitHub organization invitation. You also must have used the Unreal Linker tool described above to link your GitHub account to our repository. |
|
The |
Install the Custom Engine
Once all files have finished downloading,
run the .exe and follow through its prompts
to install the custom Unreal Engine version and corresponding Editor.
|
Are you a returning Satisfactory modder who already has a past modding environment set up? Make sure to back up your past engine version as described in the Updating your Mod guide before following these directions. |
|
If the installer asks you to select the folder with the next medium files or insert the next disc,
select the folder that contains the Additionally, make sure to name the downloaded files exactly as stated above,
otherwise the installer may be unable to locate the |
This install process, and opening Unreal for the first time afterwards, can take some time. Don’t worry about opening Unreal yet, though. It will probably ask you to compile things you haven’t properly set up yet.
Install the Visual Studio Extension (Optional)
Once the installer is done you can optionally install a Visual Studio extension shipped with the Editor. This extension allows you to directly open C++ files from the Unreal editor.
Navigate to where you installed the Editor, which is likely
C:\Program Files\Unreal Engine - CSS\,
then navigate to the folder \Engine\Extras\UnrealVS\.
Open the sub folder for the version of Visual Studio you have installed (probably 2022)
and run the .vsix installer.
Wwise
Wwise is a sound engine used by Coffee Stain, and in order to develop mods, you’ll need to install and integrate Wwise with your mod project, even if you do not plan to modify sounds.
Download the Audiokinetic Launcher
Visit Wwise and click on the
Download Audiokinetic Launcher button.
Clicking the button will probably redirect you to a sign in page.
Create an account if you don’t have one yet, or sign in, to download and run the installer.
After the installer is complete it should open the launcher for you.
Install the Wwise Version
-
Sign into the launcher if you haven’t already, otherwise it will interrupt you to do so later.
-
In the launcher’s left sidebar, select the
Wwisesection -
Under the "INSTALL A NEW VERSION" heading, click the
Latestdrop-down and change it toAll. -
Select
2023.1from the "Major" dropdown. -
Select version
2023.1.14.8770from the "Version" dropdown. -
Click
Install.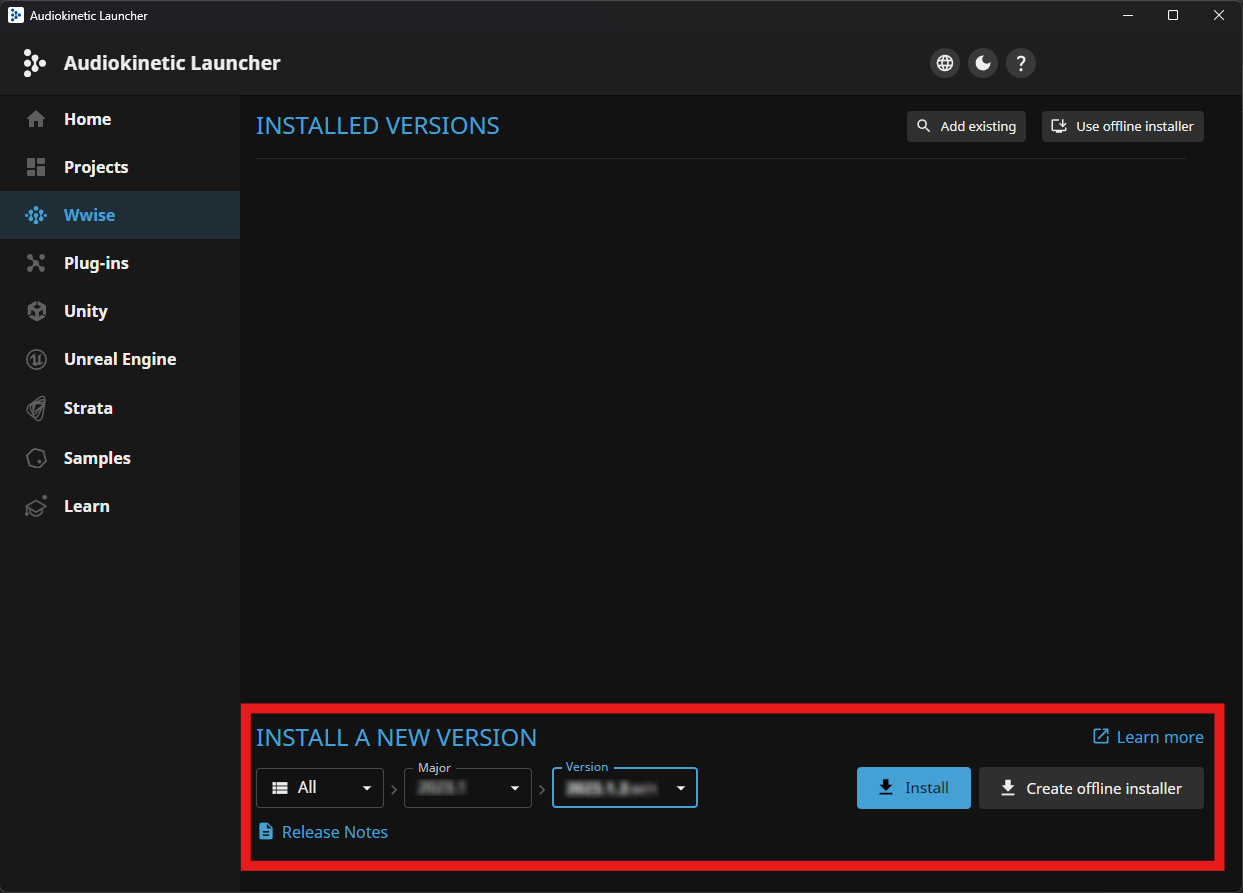 Figure 1. Installing a new Wwise version. See above for the "Major" and "Version" to select.
Try to download the exact Wwise version mentioned above. Other versions of Wwise might work, but they are likely to have other incompatible changes that will break the setup process.
If you don’t see it, try any other version starting with
2023.1.14, preferring newer versions, or asking for help on the Discord. -
Once presented with options on what packages and platforms to install, select:
-
Packages
-
✔ Authoring
-
✔ SDK (C++)
-
-
Deployment Platforms
-
✔ Linux
-
Microsoft
-
Windows
-
✔ Visual Studio 2019
-
✔ Visual Studio 2022
-
✔ Game Core
-
-
-
-
If anything else is selected by default, do not uncheck them. They are required for Visual Studio to work.
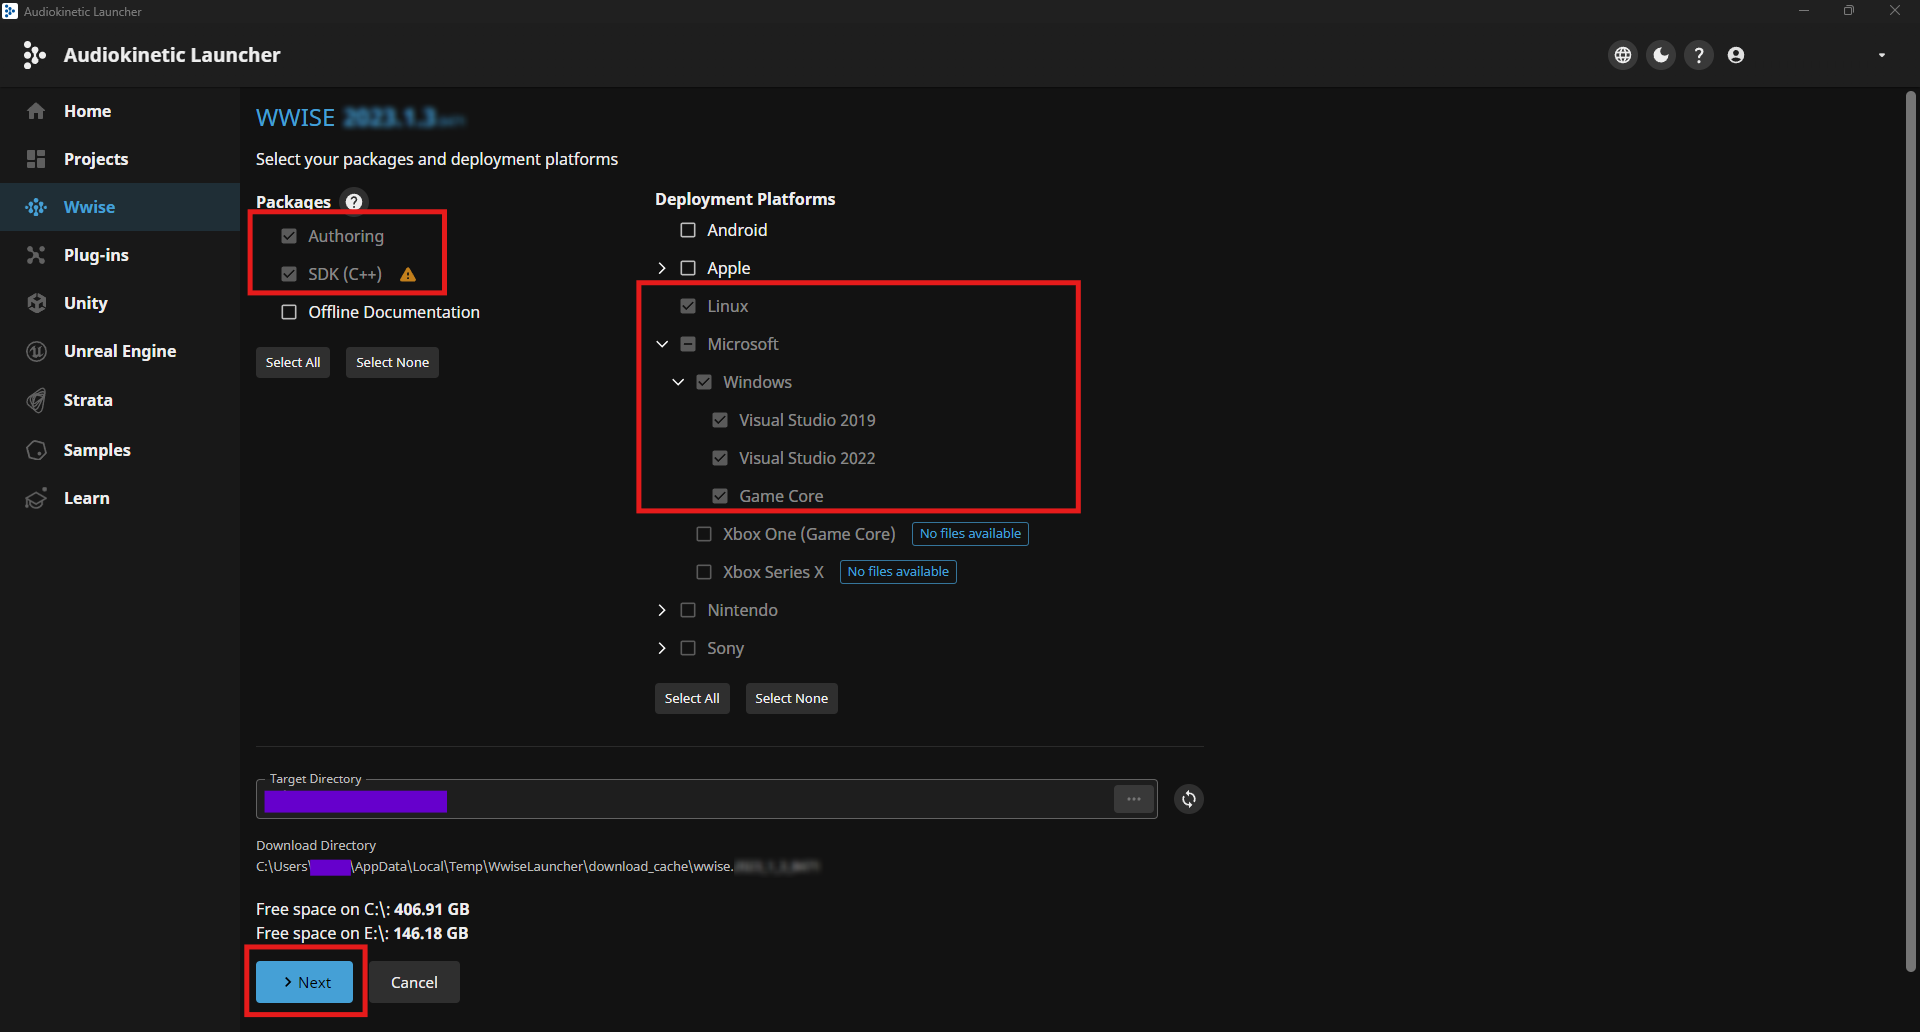 Figure 2. Selecting packages and deployment platforms. Wwise UI may differ slightly from this screenshot.
-
-
Click
Next(you may need to scroll down to see the button). -
You don’t need to add any plugins, so click the "partially selected" checkbox in the top right twice so that it turns into a "nothing selected" checkbox. This removes any pre-selected plugins.
-
Click
Install(orModifyif you already have it installed) in the bottom left to begin the installation process.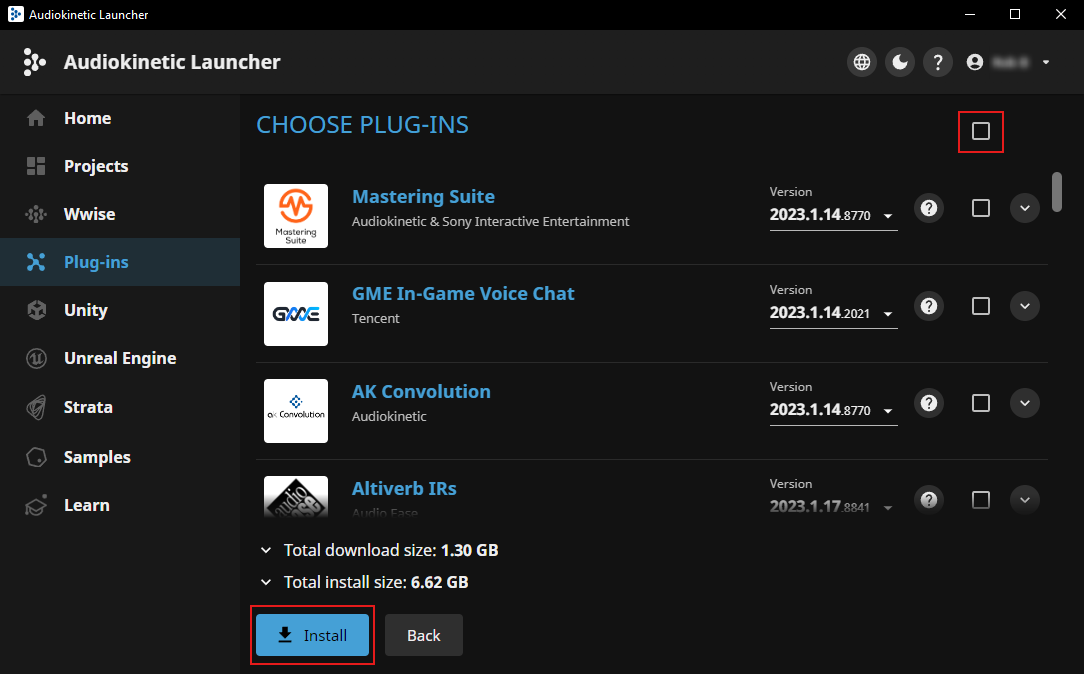 Figure 3. Deselect all plugins. Wwise UI may differ slightly from this screenshot.
 -
Accept any "User Account Control" or "Terms and Conditions" prompts that appear along the way.
-
You’re good to go once it says "Install operation completed successfully."
Satisfactory Mod Manager
Satisfactory Mod Manager is a powerful tool that automatically install the correct versions of mod dependencies for you. All end users will be using this tool, or its command-line colleague ficsit-cli, to play with your mods.
Although you don’t need to install it to develop mods,
you can use it to download other mods to test with,
such as helpful mods tagged with #developer-utility,
and to view your mod web page within the mod manager to check its appearance and formatting.
To install Satisfactory Mod Manager, follow the directions here.
Next Steps
The last dependency to obtain is a copy of the modding Starter Project. Check out the next section for directions on how to obtain it.