Custom Levels
Features introduced in SML3.5.0 and Satisfactory Update 8 make it much easier to create custom game levels.
Custom levels depend on too many assets and systems to succinctly summarize here so this page will instead cover the most important topics to getting one started.
|
Be sure to check out the Example Level included in the Starter Project’s ExampleMod. |
The Custom Level Data section explains some of the assets involved in creating a custom level.
The Level Creation section is a walkthrough on creating a basic custom level.
Custom Level Data
SML provides a framework for registering alternative levels with the game in order to avoid conflicts between mods. This section covers the assets involved in registering your custom level.
Unreal Engine Level Asset
Custom levels are backed by Unreal Engine Level assets. The Creating a Level section covers how to create a level asset.
SMLGameMapData
SML provides a data asset for holding data about your custom level for SML’s main menu changes to use. Although it’s technically possible to have a custom level without this, you must code some other way to transport the user to the level if you don’t use SML’s systems.
The tutorial later on the page will have you copy an existing one for your use,
but if you ever need to create a new one, you can do so by right clicking in a Content Browser then using
Create Advanced Asset → Miscellaneous → Data Asset then search for SMLGameMapData.
-
- Map Asset
-
A drop down to select the level asset you created.
-
- Map Name
-
The user-friendly name of the level for display in the main menu.
-
- Map Description
-
The map description to display in the main menu.
-
- Map Icon
-
The image to display for the map in the main menu.
-
- Starting Locations
-
Defines the different possible locations the pioneer can spawn in. See the below section for more info.
Starting Locations Array
The starting locations array defines where the player is able to start at.
-
- Display Name
-
User-friendly name of the starting location in the location select menu.
-
- Description
-
User-facing description providing info/lore for this starting location.
-
- Difficulty
-
Flavor text describing the challenge of playing in this starting location.
-
- Location Icon
-
The image to display in the location select menu. Recommended size : 1024px*1024px
-
- Player Start Tag
-
Links this information to an actual starting location. This field needs to be the exact same name as a "PlayerStart" placed in your level. Defining player starts in the level is explained here.
Game Instance Module
Register your Game Map data asset with SML by listing it in the Game Maps field on your Game Instance Module.
Creating a Level
This section provides an overview on getting a basic level set up and packaged with your mod. It assumes you already have a functioning mod created by following the Getting Started Guide.
Copying the Example Level with the Unreal Migration Tool
Because there are a lot of "gotchas" in the process of setting up a custom level, we highly recommend you copy the existing Example Level from the Starter Project’s ExampleMod as opposed to creating a level from scratch. Copying the Example Level as a starting point avoids many confusing error states and mistakes.
Copying an Unreal asset results normally in the copy pointing back to the same assets it was previously referencing. This is usually a good thing, but not what we want right now when copying the Example Level. If we used the standard method of copying files, we would end up with a level that still references all of the Example Mod’s assets, meaning that if the Example Mod was not installed, parts of your level would no longer work.
In order to avoid this we’ll be using the Migrate Asset action.
Navigate to the Example Mod’s content folder in your editor and find the game map data asset for the example level
(/ExampleMod/Maps/ExampleLevel/GameMapAsset_ExampleLevel) - notably NOT the level asset itself.
Right click on it, then go to the Asset Actions dropdown and select Migrate…, which will cause a popup to open.
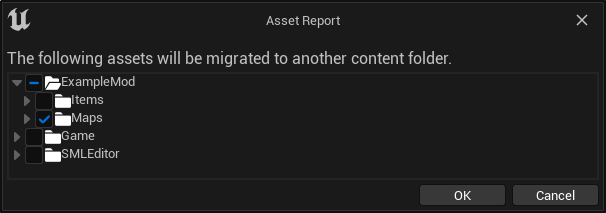
This popup’s default settings include more assets than we want to copy, so we’ll have to narrow it down.
Uncheck anything that is outside of the the /ExampleMod/ directory tree.
When you’re done, it’ll look like this:
Press Ok to be taken to a system file browser window.
Navigate to your mod’s Content folder and press Select Folder to continue.
If everything worked correctly, you should now have a /Maps/ExampleLevel folder in your mod’s content folder
and copies of assets referenced by the Example Level.
You may need to relaunch your editor for them to appear.
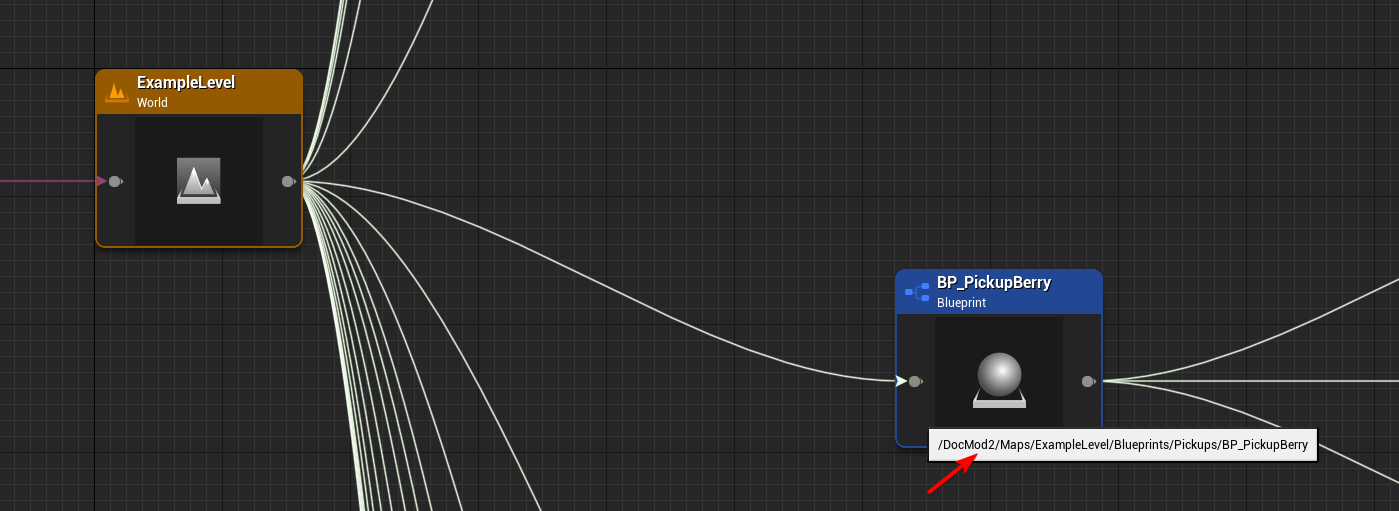
Check to make sure that the migrated assets are correctly referencing your mod’s content and not ExampleMod’s.
You can do this by right clicking on your version of the Example Level and selecting Reference Viewer…,
then hovering over any of the items in the first branch level to the right of the Level in the viewer.
The path should start with your own mod reference and not /ExampleMod/.
ExampleModRenaming Your Assets
You should start to rename your copied versions of the assets to avoid the game (and you) from getting confused about which level assets are which. At the very least, rename the following assets:
-
The folder in your mod containing the copied level assets to something like
YourModReferenceLevel. -
The level asset, ExampleLevel, to something like
YourModReferenceLevel. -
The Game Map Data asset, GameMapAsset_ExampleLevel, to something like
GameMapAsset_YourModReferenceLevel.
Setting Up your Game Map Asset
The migration process already created a Game Map Data asset for you (it’s one of the files you just renamed in the last step).
Open it up and configure it to your liking. The purpose of each field is described in this section.
If you don’t already have a Game Instance Module, create one now and mark it as the root module. Then add your level’s Game Map data asset to the Game Maps field.
Opening the Level in the Editor
You can open your level in the editor by double clicking on the level asset. You can fly around the level in a viewport editor with the usual editor camera controls. Making changes to the level will be covered in later sections.
|
Since we do not have a complete set of game code it’s not possible to use the "Play In Editor" editor feature to test your custom level. Note that this feature may still partially work in a few some situations, but it poses a high risk of crashing your editor, so save often if you want to try and use it. |
Reading Documentation Actors
You may discover some floating spinning question mark actors in the level when flying around in the editor. These Documentation Actors only appear in the editor are originally intended for opening UE documentation links. However, the Example Level repurposes them to leave "comments" about features in the level. Clicking their "Open Help Documentation" button will open a 404 page in the UE docs because this is not their purpose.
In order to view the comment, select the actor in the level then look at the Details window. Scroll down to the "Help Documentation" section and view the "Document Link" text field to read the comment. You can also hover over the field to get a tooltip containing the full comment text.
Editing the Level Blueprint
Each game level has a special blueprint called the Level Blueprint. This is a good place to run level-specific setup code. To view and edit the Level Blueprint, open it with the dedicated button in the top bar’s Blueprints button.
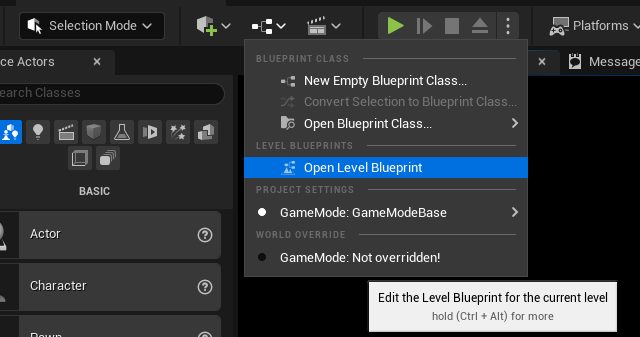
Since you copied the example level, there is already some code in here. Some of it is required to prevent the game from crashing when the player enters and some of is from the example level’s custom functionality - read the comments to learn more.
Making changes to the level will be covered in later sections.
Testing It Out
You should now be able to test your level in the game. It should look and behave exactly like the Example Level since we haven’t changed anything yet. Make sure all assets are saved then package your mod with Alpakit and launch the game. Open the New Game tab, and, assuming everything was done correctly, your custom map should appear as an option you can load into.
Adding Level Content
This section covers additional features you may want to add to your level. It’s still a work in progress, please contact us on the Discord or use the Edit This Page feature if you have suggestions.
|
Learn how to use non-Satisfactory-specific features of the Level Editor in Unreal Engine’s own documentation and videos online. |
Adding Starting Locations
To add new starting location, Open "Window"→"Level Editor"→"Place Actor". Then Search "Player Start" in search bar.
You will see "Player Start", drag and drop it into Viewport window, place wherever you want. When you look closer to "Player Start", you will see skyblue arrow. This arrow indicates where player will look when it spawned.
Select placed "Player Start", In Details tab, you will see "Object"→"Player Start Tag". Put the name then go back to SMLGameMapData and put your "Player Start Tag" name to SMLGameMapData’s "Player Start Tag" field.
Adding Objects To a Custom Level
If you have a custom level loading, odds are you want some objects in there, this list details how to do just that.
To add items, use Place Actor window or manually drag and drop from Content Browser. Let’s place an ore node. To add this, simply go to /Content/FactoryGame/Resource/BP_ResourceNode, and drag it onto your level. It won’t quite look right in editor, but when loaded at runtime, it will automatically be replaced with the right model, and textures.
Or If you want to see actual model, search "ManuallyPlacedIronNode" in Outliner window, then duplicate it. You need to change StaticMesh and Materials.
After you place the node, you can select it in the viewport (it doesn’t have any model, so you might have to use the World Hierarchy instead), then on the side in the details panel you can set all the properties, such as what the node produces, the node purity, or how much it can produce.
Minimap Setup
|
The Example Level already has the minimap capture actor set up so you won’t crash when loading in. |
As you try open Minimap(M) in game, game will crash. To avoid this crash, assign a mMinimapCaptureActor in the World Settings.
Open "Window"→"World Settings" window. Scroll down to find "Minimap" section. Search "BP_MinimapCaptureActor" in Outliner window then assign it to that field.
The minimap will still display an image of the base game’s map by default.
To change map texture, you need to change
/Content/FactoryGame/Interface/UI/Minimap/Widget_Map→mMap→Appearance→Brush→Image material
using a CDO.
|
We are not sure how to adjust the map’s coordinate system yet. As a result, all player, vehicle, etc. icons will appear packed in one corner of the map. |
Troubleshooting
-
- Where is the Oil node mesh?
-
Oil nodes use a decal instead of a mesh.
-
- Gas Pillars don’t visually emit clouds
-
Gas pillars use a special system to control their visual effects. See the floating documentation actors in the example level.
-
- Crab hatchers don’t detect the player
-
Don’t forget to assign a value to the Sphere Radius field in CharacterDetection under Char_CrabHatcher.
-
- All of the models in the editor appear as white cubes
-
Follow the directions on the Asset Toolkit page to generate a complete starter project.
-
- No music is played
-
We aren’t sure how to trigger music in custom levels yet. Try using ambient volumes.
-
- Creatures don’t spawn or move!
-
Increase the area of the NavMeshBoundsVolume, or add one if it doesn’t exist yet.
-
- Lumen is not working!
-
We are not sure how to get Lumen working in custom levels yet.
-
- The sky is dark and I crash a few seconds after loading into the level!
-
Make sure your Project Settings have
FGWorldSettingsas the World Settings Class.
World Partition System
The World Partition system introduced in Unreal Engine 5 is the suggested method for making large levels. The base game uses this for its own level and was a notable factor in Coffee Stain’s decision to move to UE5.
Interfacing with the World Partition System is also the ideal way of adding level-like content (such as new ore nodes, terrain, or foliage) to the game.
Unfortunately it is not yet possible to interact with the World Partition system with the current modding toolkit. Getting this working requires changes on both the Coffee Stain and SML sides of things. Ask on Discord to learn more about the current state of this feature.